Dadget

To be honest, I’m collecting the 3D printer for the first time. For me it was always something complicated and incomprehensible, something that they can only collect in laboratories. But came in 2017, and the printer can be assembled at home. It is enough to read the instructions. Modular 3D printer Funtastique EVO v1.0 is suitable for the role of the first home printer Dadget, when you do not need special knowledge in 3D printing. It’s going to be easy, as a children’s designer, nothing to solder and programming is not necessary. All have already been set up for us.
Packaging

The box is impressive. And what’s inside?

What’s inside
Packing List.

Packing List
Features
Parameters The 3D printer Funtastique EVO v1.0
The area of the press (XYZ) : 125 x 130 x 160 mm
Print layer height: from 0.05 mm
Diameter of the nozzle: 0.40 mm
Software: CURA RepetierHost
Types of consumables: PLA, PVC, PETG, PP, Wood
Weight: 5,0 kg

The details are densely lying in the foam plastic
Modularity
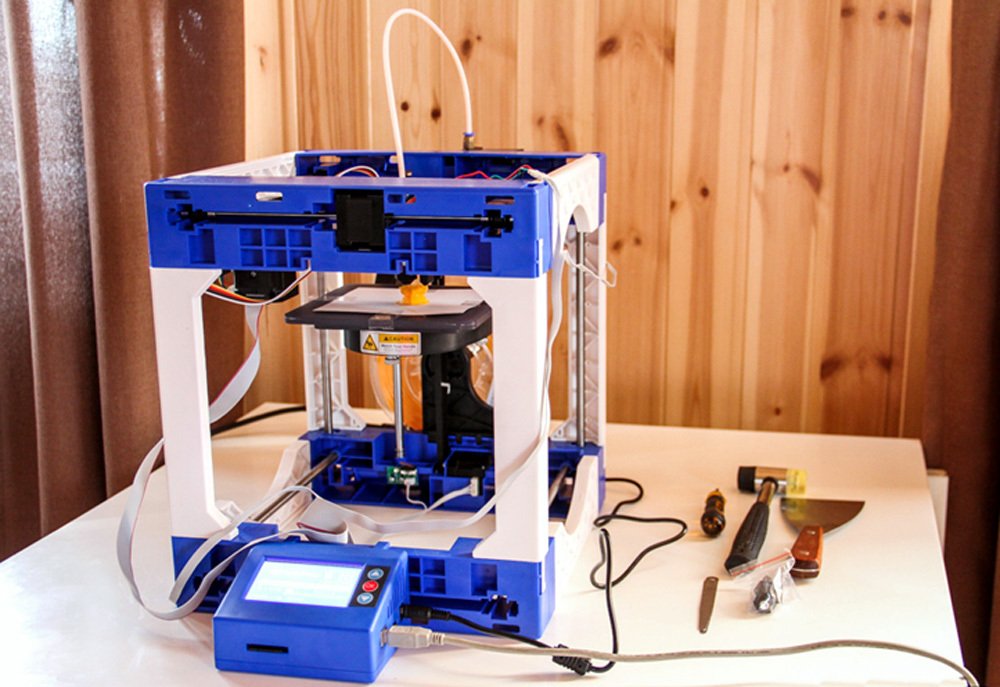
The printer consists From the modules. The manufacturer offers a printer in the finished form and in the form of a designer. I came to the printer in the set “Do it yourself” in blue. As far as I know, Dadget also has an orange one.

Discovering
Assembly
His Easy to assemble and disassemble. All parts are fastened with fasteners. The ABS plastic is made of a lightweight frame.
Collecting
If it is placed in a room or in a study, the interior will not spoil the appearance of the interior. All thanks to the stylish design. I took half an hour to build and configure the printer. To fasten all the details with the help of fixatives is a pleasure.

Setting of the table
The working table on magnets. The manufacturer says that you can do without sticky tape. This is partly true. But if the detail is high, then without tape – further work will be impossible.

The appearance of the table
The table is easy to put and take off. Collecting.

Assembly
We attach special guides.

Mounting the rails
We plug the modules into the grooves.

Nozzle
We put the block with the nozzle

Already almost ready
The exterior looks like a device.

Latches
It is convenient to bring the latches into place with a rubber mallet.

What is a hammer, and what can they do
When all The parts are installed, we connect the drive belts.

Belt
The instructions carefully follow the numbers of the mounted parts.

The tube
We connect the tube to the guide plastic.

Control unit
Launching
Connecting the
And connecting all the wires. 
Launching the printer
The printer blinked and joyfully reported, h Then it is ready to work.

Head
The peculiarity of this printer is that it can work offline. It’s enough to turn off the model in gcode format on the flash drive and load it into the printer.
Software
The printer is conveniently managed with the help of the Cura program.
[1945-09003] The Cura program is included
The Cura program is completely in Russian, working with it is a pleasure, at least for me, a complete loser in this new For me the case.
Test print

Test print
I try the test print. [1 9459007]

Be sure to lay the pad
You can not do without lining. It is even better to purchase a special adhesive tape. Below I will show why. Then the detail will sit securely on the table.

Monitor
The printing process took about 5 minutes.

Plastic feeding
Plastic is fed through the plastic feeding unit.

Coil mounting
Coil Is located below.

The printing process
The seal goes without any mistakes.

Printed
A geometric object appears on the output.

П Without a sticky paper, instead of a bottom, you get a curve
If you try to print a model without adhesive tape or paper, then the model can get a little curve. In general, the main reliable bottom.
The first pancake is lumpy

Marriage as a cause of printing without special tape
One-way cattle let down at the very end, when the robot needed his eyes. The model rocked and the robot was left without eyes. Therefore, it is important to install a special tape for printing.
Correct print
After the calibration, clear figures were obtained

Figurine After calibration

The tank after calibration
Conclusion
I liked the printer. If everything is done according to the instructions, namely: to lay a lining under the table, to use an adhesive tape, to perform a calibration, then problems do not arise. I recommend this model as the first 3D printer to study software, printing the right home parts. In the future I want to print 3D parts for my car. The car is old, spare parts are not easy to get and not cheap. A software in the nete can be found. Something like this. Thank you!
Those who are interested in the 3D printer Funtastique EVO v1.0 and want to save 10% on its purchase, please use GT-3D promo code which is valid for 14 days Dadget
]
Author: Dmitry (kot-de-azur), the city of Yessentuki


